
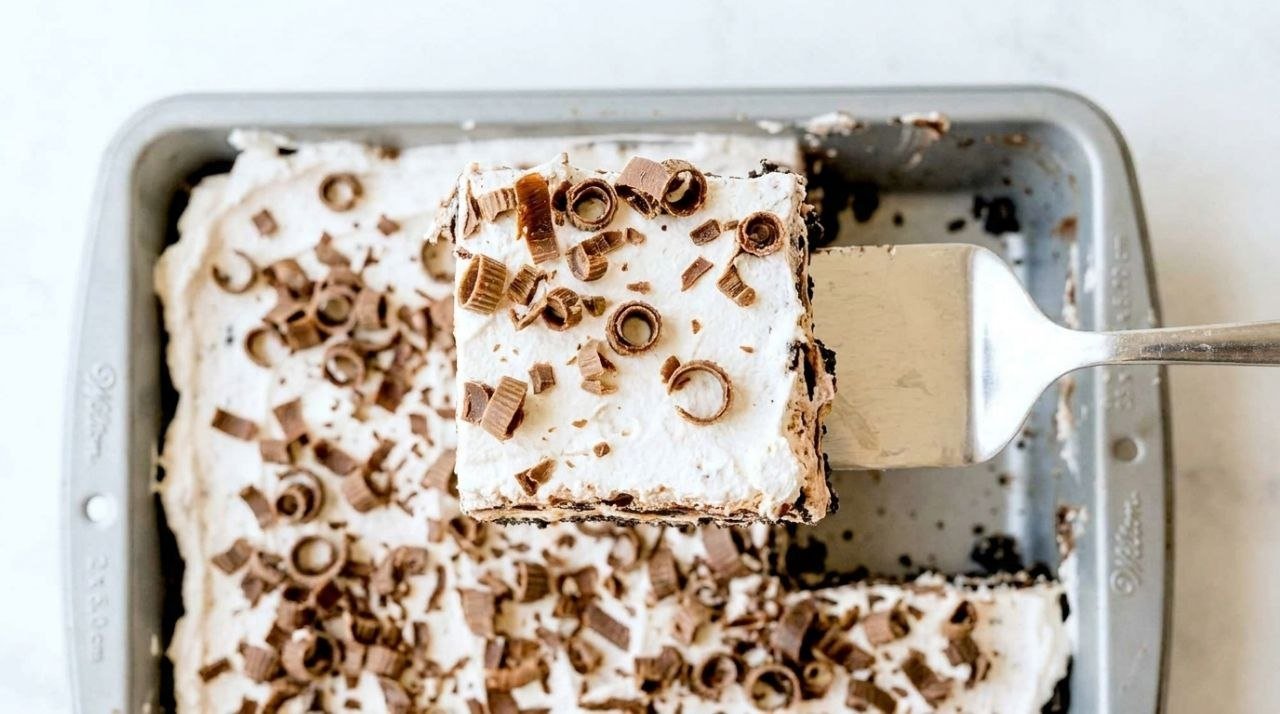
No Bake Chocolate Lasagna is the dessert that earns the most recipe requests at every potluck it appears at — a cold, sliceable 9×13 pan layered with a firm buttered Oreo crust, a cloud of sweetened cream cheese folded through with whipped topping, a thick chocolate pudding layer that sets clean and glossy in the refrigerator, and a final blanket of whipped cream scattered with miniature chocolate chips and crushed cookie crumbles. It requires no oven, no special equipment beyond an electric hand mixer, and no decorating skill, yet it slices into clean, layered squares that look considerably more deliberate than the twenty minutes of prep time that produced them. The name is half the charm — calling a no-bake dessert lasagna implies effort and structure, and this one delivers both without asking for any heat, any technique, or any patience beyond the four hours of refrigerator time that turns a pan of layered components into a fully set, deeply chocolatey dessert worth driving to a party for.
What makes this version genuinely excellent rather than merely convenient is the precision of the cream cheese layer. Most versions use too little cream cheese and too much sweetener, producing a middle that tastes like sweetened foam rather than a distinct flavor layer — something the pudding and the crust both compete with rather than contrast against. This recipe uses the full eight ounces of cream cheese beaten until truly fluffy, with just enough powdered sugar to balance the tang rather than eliminate it, and only one container of whipped topping folded in rather than two. The result is a middle layer that tastes like a light, cool cheesecake — softly tangy, rich without being heavy, and dense enough to hold the pudding above it while still yielding cleanly when the fork comes down. That contrast between the crunchy crust below, the creamy tang in the middle, and the deep chocolate pudding above is what makes every bite feel layered in flavor rather than just layered in texture.
Why the Refrigerator Does All the Work
No bake desserts like this one rely entirely on physical setting processes rather than the chemical transformations that baking produces. The Oreo crust sets because butter, which is solid fat at room temperature, melts during mixing to coat every crumb and then resolidifies in the refrigerator, binding the crumbs together the way a mortar binds bricks. The cream cheese layer holds its shape because fat molecules in cream cheese form a stable emulsion with the sugar and air beaten into them, and that emulsion remains firm at refrigerator temperatures even without any gelatin or eggs. The pudding layer thickens through a different mechanism entirely: instant pudding contains modified food starch — starch that has been chemically treated to hydrate and gel at room temperature rather than requiring heat, which is what allows it to thicken milk into a sliceable layer in minutes rather than requiring cooking on the stovetop.
The Science of the Perfect Clean Slice
The reason this dessert slices cleanly after a full overnight chill — producing neat, layered squares rather than collapsing into a soft pile — is that all four components reach their firmest, most stable state at the same refrigerator temperature simultaneously. The fat in the crust is hard, the emulsified cream cheese layer is firm and cold, the modified starch in the pudding has had maximum time to hydrate and gel completely, and the whipped topping on top has settled into a compact, stable layer. When each component is fully set, the knife can pass through all four layers without disturbing the boundaries between them. This is also why the recipe emphasizes chilling between each layer as you build it — adding soft warm pudding directly onto a freshly spread cream cheese layer before either has had a chance to firm up creates a blurred, collapsed middle rather than distinct visual layers that hold when the pan is cut.
Overnight refrigeration also improves the flavor in a way that a four-hour chill does not fully replicate. As the dessert sits, the Oreo crumbs in the crust absorb a small amount of moisture from the layers above them and soften slightly at the contact surface — not enough to lose their structure, but enough that the boundary between crust and filling becomes integrated rather than abrupt, which makes the bottom of each square taste like it belongs to the dessert rather than sitting under it. The chocolate pudding deepens in flavor as the starch network continues to set and the cocoa compounds redistribute through the liquid, and the cream cheese layer loses any last trace of the slightly sharp, just-beaten flavor and settles into something mellower and more dessert-like. Patience with the chilling time is the one technique this recipe actually requires.
What Goes In
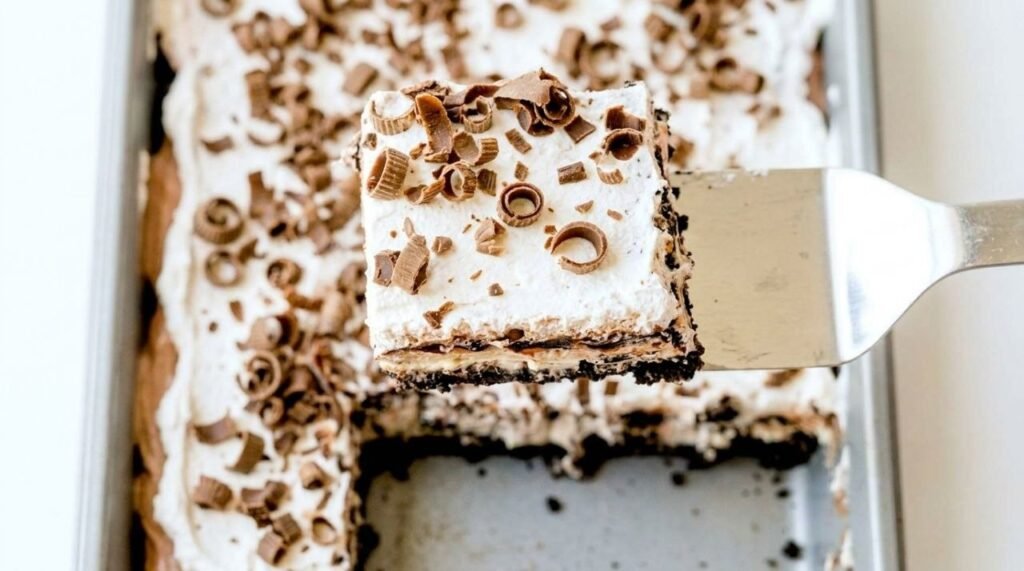
Four layers, twelve straightforward ingredients, zero oven time.
36 regular Oreo cookies, whole with cream filling included.
6 tablespoons unsalted butter, melted.
8 oz cream cheese, softened fully to room temperature.
1 cup powdered sugar, sifted.
1 teaspoon vanilla extract.
Two 8 oz tubs whipped topping, thawed and divided.
Two 3.9 oz boxes instant chocolate pudding mix.
3 1/4 cups cold whole milk.
1 cup miniature chocolate chips, for topping.
1/2 cup reserved Oreo crumbs, for topping.
Variations Worth Trying
Swap the regular Oreos for Golden Oreos if you want a sweeter, vanilla-flavored crust that contrasts more sharply against the dark chocolate pudding — the pale golden base makes the layered cross-section look more visually dramatic when the pan is sliced.
Use white chocolate pudding in place of chocolate pudding for a completely different flavor profile that still works beautifully with the Oreo crust and cream cheese layer — the pale filling makes the dessert look lighter and tastes sweeter and more vanilla-forward.
Fold 1/2 cup of smooth peanut butter into the cream cheese layer along with the powdered sugar for a peanut butter chocolate version that is richer and more complex than the standard recipe, especially with a chocolate drizzle on top instead of just mini chips.
Add a layer of sliced bananas directly on top of the cream cheese layer before spreading the pudding if you want a chocolate banana variation — the fruit adds freshness and a soft texture that breaks up the richness of the chocolate without changing the basic assembly process at all.
How to Make No Bake Chocolate Lasagna
Step 1 – Make and chill the crust: Crush the whole Oreo cookies — cream filling included — in a food processor until you have fine, uniform crumbs, reserving about half a cup of slightly coarser crumbs for the topping. Pour the melted butter over the crumbs and pulse or stir until every crumb is evenly coated and the mixture holds together when pressed between two fingers. Press this mixture firmly and evenly across the bottom of a 9×13-inch pan using the flat bottom of a measuring cup, applying real pressure so the crust is compact and dense rather than loose. Place the pan in the freezer for 10 minutes while you prepare the next layer.
Step 2 – Make the cream cheese layer: Beat the fully softened cream cheese with an electric hand mixer on medium speed for about 90 seconds until it is genuinely light and fluffy — this beating step is what creates the airy texture that makes the layer taste like cheesecake rather than just sweetened spread. Add the sifted powdered sugar and vanilla extract and beat again until smooth and fully combined. Fold in one full 8 oz tub of whipped topping using a rubber spatula, using gentle folding strokes rather than stirring so you preserve as much air as possible. Retrieve the pan from the freezer and spread this layer evenly over the crust, pressing it gently into the corners. Return the pan to the freezer for another 10 minutes.
Step 3 – Make and spread the pudding layer: In a large bowl, whisk together both boxes of instant chocolate pudding mix and the cold whole milk for about 2 minutes until the mixture thickens noticeably. Let it stand for 2 to 3 minutes to continue setting — it should be thick enough that it holds its shape briefly when drizzled from the whisk before spreading. Retrieve the pan from the freezer and spread the pudding carefully over the cream cheese layer using an offset spatula, working gently from the center outward to avoid pushing the cream cheese layer out of place. Return the pan to the refrigerator for 15 minutes.
Step 4 – Add the whipped topping layer: Spread the remaining 8 oz tub of whipped topping evenly over the set pudding layer in a smooth, even blanket that covers the chocolate completely from edge to edge. Scatter the miniature chocolate chips across the entire surface, then sprinkle the reserved Oreo crumbs over the top for texture contrast and visual definition. The topping should look generous and slightly rustic rather than precisely decorated — this dessert earns its appeal from abundance, not precision.
Step 5 – Chill fully before serving: Cover the pan tightly with plastic wrap and refrigerate for a minimum of 4 hours, though overnight is strongly preferred for the cleanest slices and the most developed flavor. When ready to serve, use a sharp knife wiped clean between each cut to slice the dessert into even squares, pressing straight down through all layers rather than dragging the knife. Serve cold directly from the pan and return any remaining portion to the refrigerator immediately rather than leaving it out.
3 Mistakes That Ruin Chocolate Lasagna
Using cold cream cheese instead of room temperature: Cold cream cheese does not beat smooth — it stays lumpy no matter how long the mixer runs, producing a cream cheese layer that is grainy and uneven rather than silky. Take the cream cheese out of the refrigerator at least an hour before you plan to make the dessert, or leave it on the counter for two hours. A properly softened block presses easily when you push a fingertip into it without resistance, which is the reliable test for whether it will beat correctly.
Spreading the pudding before it has thickened properly: Instant pudding needs two to three minutes to reach a spreadable, soft-set consistency after mixing. If it is spread while still thin and pourable, it runs under and through the cream cheese layer rather than sitting on top of it, blurring the boundary between layers and producing a dessert that looks muddy inside when sliced. Mix it, wait for it to thicken visibly, and spread it only when it holds its shape briefly when the whisk is lifted.
Not chilling long enough between layers or at the end: Every layer in this dessert needs time to firm up before the next one is added, and the finished dessert needs four hours minimum — eight hours ideally — before it is sliced. Rushing either the between-layer chilling or the final refrigerator time produces a dessert that collapses when cut, with the layers sliding away from each other instead of holding the clean boundaries that make each square look as good as it tastes.
What to Serve With Chocolate Lasagna
This dessert is rich and filling on its own, which is exactly what makes it ideal for large gatherings — it needs nothing alongside it to feel complete, and it travels well in the pan it was made in. For a dessert table that offers contrast, serve it next to something light and fruit-forward so guests who want something less chocolate-heavy have an option. For a dinner party finish, it pairs beautifully with hot coffee, which amplifies the chocolate flavor the same way it does with a brownie. If you want a full no-bake dessert spread, serve it alongside our No Bake Cheesecake for a complementary pair of cold, creamy desserts that cover both chocolate and vanilla flavor directions without requiring the oven to be turned on at all.

Easy No Bake Chocolate Lasagna
Ingredients
Equipment
Method
- How to Make No Bake Chocolate Lasagna
- Step 1 – Make and chill the crust: Crush the whole Oreo cookies — cream filling included — in a food processor until you have fine, uniform crumbs, reserving about half a cup of slightly coarser crumbs for the topping. Pour the melted butter over the crumbs and pulse or stir until every crumb is evenly coated and the mixture holds together when pressed between two fingers. Press this mixture firmly and evenly across the bottom of a 9×13-inch pan using the flat bottom of a measuring cup, applying real pressure so the crust is compact and dense rather than loose. Place the pan in the freezer for 10 minutes while you prepare the next layer.
- Step 2 – Make the cream cheese layer: Beat the fully softened cream cheese with an electric hand mixer on medium speed for about 90 seconds until it is genuinely light and fluffy — this beating step is what creates the airy texture that makes the layer taste like cheesecake rather than just sweetened spread. Add the sifted powdered sugar and vanilla extract and beat again until smooth and fully combined. Fold in one full 8 oz tub of whipped topping using a rubber spatula, using gentle folding strokes rather than stirring so you preserve as much air as possible. Retrieve the pan from the freezer and spread this layer evenly over the crust, pressing it gently into the corners. Return the pan to the freezer for another 10 minutes.
- Step 3 – Make and spread the pudding layer: In a large bowl, whisk together both boxes of instant chocolate pudding mix and the cold whole milk for about 2 minutes until the mixture thickens noticeably. Let it stand for 2 to 3 minutes to continue setting — it should be thick enough that it holds its shape briefly when drizzled from the whisk before spreading. Retrieve the pan from the freezer and spread the pudding carefully over the cream cheese layer using an offset spatula, working gently from the center outward to avoid pushing the cream cheese layer out of place. Return the pan to the refrigerator for 15 minutes.
- Step 4 – Add the whipped topping layer: Spread the remaining 8 oz tub of whipped topping evenly over the set pudding layer in a smooth, even blanket that covers the chocolate completely from edge to edge. Scatter the miniature chocolate chips across the entire surface, then sprinkle the reserved Oreo crumbs over the top for texture contrast and visual definition. The topping should look generous and slightly rustic rather than precisely decorated — this dessert earns its appeal from abundance, not precision.
- Step 5 – Chill fully before serving: Cover the pan tightly with plastic wrap and refrigerate for a minimum of 4 hours, though overnight is strongly preferred for the cleanest slices and the most developed flavor. When ready to serve, use a sharp knife wiped clean between each cut to slice the dessert into even squares, pressing straight down through all layers rather than dragging the knife. Serve cold directly from the pan and return any remaining portion to the refrigerator immediately rather than leaving it out.
Notes
